
how to proper belay top rope
Setting Up the Belay

As the climber secures themselves to the harness using a figure 8 knot (learn here), it's crucial to follow several steps for a safe belaying process.
Begin by closing the system with a stopper knotat the end of the rope, preventing it from slipping entirely through the belay device and causing the climber to drop. When dealing with a significantly heavier climber, consider also tying into a ground anchor(learn here), especially in less-than-ideal belaying situations where obstacles may be present between you and the climbing surface.Next, set up the belay device by threading a bight of the rope through the tube nearest to your dominant hand. While many belay devices are symmetrical, some feature a grooved inner surface on one side of each tube, offering additional friction for belaying a heavier climber or managing a thinner or more slippery rope than usual. Ensure that the climber-rope side of the bight, extending to the anchor and back down to the climber, remains on the top side of your belay device.Attach a locking carabiner, passing it through both the bight and the belay-device cable, as well as your harness belay loop. Prevent the rope bight from crossing over the cable to avoid placing undue stress on the belay device's cable. Finally, lock the carabiner securely in place. These steps contribute to a solid and reliable belay setup for a safe climbing experience.
Performing the Safety Check
Prior to embarking on the climb, it is imperative for both the climber and belayer to conduct a thorough double-check of each other's setup to ensure a safe and secure climbing experience:
Knots:
Verify that the climber's figure 8 knot is tied correctly.Confirm that the belayer has closed the system properly with a stopper knot, preventing any unintended slippage.
Buckles:
Ensure that both harnesses are snug and that buckles are securely fastened.Whether the buckle design inherently incorporates safety features or, in the case of older harnesses, requires the climber's intervention, confirm that straps are double-backed through buckles for a secure fit.
Belay Device:
Check the belay device to ensure it is correctly threaded with the rope.Confirm that the carabiner passes through the rope, belay-device cable, and harness belay loop.Verify that the carabiner is securely locked in place.
Command Check:
Run through a communication check to review and confirm the terminology used.Ensure mutual agreement on every term that will be employed during the climb to avoid any misunderstandings.This comprehensive check ensures that all critical aspects of the climbing setup, including knots, harnesses, belay devices, and communication protocols, are meticulously inspected, minimizing the risk of potential hazards during the climb
Belay Communication
Belay Communication
Be loud with these, because miscommunication can be as consequential as any other type of climbing-system failure. Review commands initially to be sure you and your partner are on the same page.
Here are the common commands:
Climber: “On belay?” (Are you ready to belay me?)
Belayer: “Belay on.” (Slack is gone and I’m ready.)
Climber: “Climbing.” (I’m going to climb now.)
Belayer: “Climb on.” (I’m ready for you to climb.)
Climber: “Slack!” (Pay out a little rope.)
Belayer: (Pay out rope and pause to see if climber asks again.)
Climber: “Up rope.” (Pull in rope slack.)
Belayer: (Pull in slack and pause to see if climber asks again.)
Climber: “Tension.” (I want to rest by hanging on the rope now.)
Belayer: (Remove all slack and hold tight.) “Gotcha.”Climber: “Ready to lower.” (I’m done climbing.)
Belayer: (Reposition both hands to brake.) “Lowering.”
Climber: “Off belay.” (I’m standing securely on the ground.)
Belayer: “Belay off.” (I’ve stopped belaying you.)
The “take” command: Many climbers use this rather than “tension” when they want the belayer to remove slack and take the weight of the climber on the rope. The argument for using “tension” instead is that “take” can be confused with “slack,” and confusing those commands would be a very bad thing.
Naming names: Start every command with your partner’s name. On a crowded crag or in a busy gym, voices are hard to distinguish. One sure way that your partner will know that the command came from you is to add your partner’s name to it.
Other Important Commands: If you hear these shouted by a climber, with or without a name, ready yourself."Rock!" This is for anything, natural or manufactured, that gets loose. When you hear this, look down (not up) so your helmet can protect you."Watch Me!" This means a climber thinks a fall is likely."Falling!" Means exactly what you think it means.
Belay Technique
The following are fundamental belay principles that contribute to a safe climbing experience:
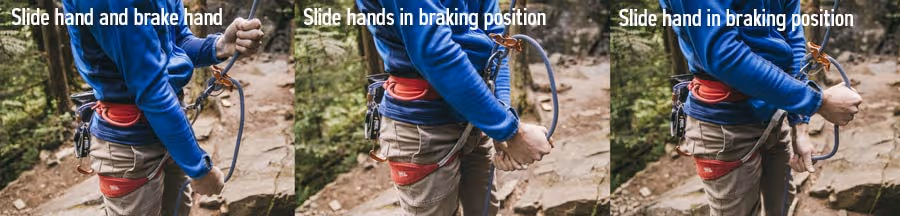
Always Keep Brake Hand(s) on the Rope:
Maintain constant contact with the rope using your brake hand(s). This is a non-negotiable safety measure.Slide Hand Only
When Firmly Held in Braking Position:S
lide your hand along the rope only when it is securely held in the braking position to ensure control and safety.
Orient Brake Hands in Strongest Natural Position:
Position your brake hands in their strongest natural state to optimize control and responsiveness.
Maintain Attention on the Climber and Surroundings:
Stay attentive to the climber and be vigilant for any potential hazards in your surroundings.
Proper Belay Stance:Athletically: Keep your non-dominant foot forward, maintain bent knees, and keep your body relaxed yet prepared.
Geographically:
Stay close to the wall, one step away from being directly under the climber's route to avoid impact.
Organizationally:
Neatly stack any rope on the ground to prevent tangles while belaying.
Proper Hand Position:
Brake Hand:
Grip the rope about six inches below the belay device, ensuring the thumb and forefinger are up.
Guide Hand:
Position your opposite hand on the climber's side of the rope, slightly above your head at a comfortable height.
PLUS (Pull, Lock, Under, Slide) Technique:
A method for efficiently taking in slack when belaying a top-rope climber.
Watch and Listen Closely:
Always pay attention to the climber, pausing when they do, and be ready to catch a fall or lower the climber.
Catching a Fall:
React quickly by pulling the brake hand down and using your body, harness, rope, and belay device to absorb the force of the fall.
Holding a Climber Who Pauses:
When the climber requests a pause, respond with "Tension!" by removing slack, pulling down the brake hand, leaning back, and yelling "Gotcha!"
Lowering a Climber:
When the climber requests to be lowered, bring the guide hand under the brake hand, maintain a steady pace, and pause as needed for obstacles.
Belay Off:
When the climber is safely on the ground, they yell "Off belay!" You respond by paying out plenty of slack and yelling "Belay off!"